Top Picks


Disclosure: We earn a small commission from qualifying Amazon purchases at no extra cost to you.
Reviewed by the Sauneer Editorial Team
Finding the right how to clean an infrared sauna comes down to matching watt-hours to your actual power needs.

Last Updated: June 2026 | Written by the Sauneer Editorial Team | 9-minute read
The 30-Second Answer
Wipe interior wood with a damp microfiber cloth and a mild solution of warm water plus a few drops of unscented castile soap (or diluted white vinegar at roughly 1:10). Dust cool infrared panels with a dry brush. Air out the cabin for 30 minutes after every session. Never use bleach, glass cleaner, fragrance sprays, or anything petroleum-based — they soak into unsealed cedar or hemlock and bake out the next time you fire it up.

That's the headline. What follows is the why, the weekly rhythm, and the long-game care that keeps your wood honey-colored and your heaters humming at full output for a decade — not three years.
At a Glance: The Numbers That Matter
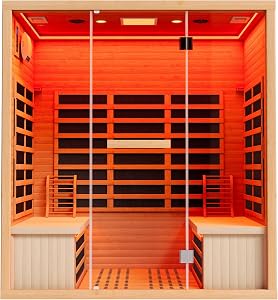
Why Your Infrared Sauna Gets Dirty Faster Than You Think
Here's a truth that surprises almost every new owner: your gleaming new infrared cabin will get filthy faster than a traditional Finnish sauna ever did — and you won't see it happening until it's already a problem.

Most infrared saunas don't fail because their heaters burn out. They fail because their owners treat them like furniture — wipe them once, forget them forever. The cabin that lasts a decade isn't the most expensive one. It's the one whose owner spent five minutes after every session.
| The Hidden Cost of Skipping Cleanup | What Actually Happens |
|---|---|
| Wood discoloration | Dark blotches that no amount of sanding fully removes |
| The "week three" smell | A faint sour odor that builds when sweat residue ferments |
| Energy creep | Dusty heater faces drop emissivity, raising warm-up time and your power bill |
| Lifespan loss | A neglected cabin ages 3x faster than a maintained one |
| Resale collapse | A stained, smelly sauna loses 40-60% of its used-market value |
Unlike a traditional Finnish sauna, an infrared cabin runs cooler — typically 110-140°F — and you sweat more, not less, because your skin lingers in the heat far longer. That sweat carries skin oils, deodorant residue, magnesium, urea, and whatever lotion you forgot to rinse off in the shower. It lands on the bench, the floor slats, the backrest, and the lower wall panels.
Left alone, three quiet problems unfold:
- The wood develops dark blotches that no amount of sanding fully removes
- A faint sour smell builds — most owners first notice it around week three of skipping cleaning
- The carbon or ceramic emitters lose efficiency as a film of airborne dust and oil settles on their faces, dropping infrared output and silently inflating your electric bill
Watch: The 5-Minute Routine That Saves Your Sauna
The Daily 5-Minute Ritual (Do This After Every Session)
Think of this like brushing your teeth. Skip a day? Nothing happens. Skip a month? Something definitely happens. Here's the exact sequence professionals follow:

Step-by-Step: The Post-Session Routine
1. Open the door wide — immediately. The single most powerful thing you can do. A 30-minute air-out drops interior humidity from sauna levels back to room ambient, halting microbial growth before it starts.
2. Wipe the bench, backrest, and floor slats with a dry microfiber towel. This catches 80% of the sweat before it can soak in. Don't skip the underside of the bench — it's where droplets pool.
3. Damp-wipe high-contact zones. A microfiber cloth lightly dampened (not wet) with warm water and a single drop of unscented castile soap. Bench, backrest, headrest, door handle.

4. Inspect the floor. Lift the floor mat or duckboard. Sweat collects underneath in puddles you'd never see otherwise. Wipe dry, leave the mat off for the air-out window.
5. Leave the door cracked for 30 minutes. The cabin needs to fully equalize with room air. This is non-negotiable.
The Weekly Deep Clean (15 Minutes, Sunday Morning)
Once a week, escalate. This is where you get ahead of problems instead of chasing them.
| Zone | Tool | Solution | What You're Fighting |
|---|---|---|---|
| Bench tops & backrest | Microfiber cloth | Warm water + castile soap (3 drops/quart) | Sweat salts, skin oil |
| Wall panels (lower 3 ft) | Microfiber cloth | 1:10 white vinegar to water | Mineral haze, faint odor |
| Floor slats / duckboard | Soft brush + cloth | Warm water, then dry wipe | Pooled moisture, dust |
| Heater faces (COOL!) | Soft dry paintbrush | Nothing — dry only | Dust film that cuts output |
| Glass door | Microfiber cloth | Warm water only — no Windex | Streaks that bake on |
| Door seals & hinges | Cotton swab | Dry | Hidden moisture pockets |
Never — and we mean never — apply any liquid to your infrared heater panels. Not water, not vinegar, not glass cleaner, not your favorite "natural" spray. Liquid on a carbon or ceramic emitter face creates two failure modes: it can crack the panel on next heat-up, and it leaves a residue that smokes and smells the moment you fire the cabin. Dust only, with a dry brush, on a cool unit.
What to Use — and What Will Destroy Your Wood
This is the section that saves cabins. Print it. Tape it to the wall.
- Warm water
- Unscented castile soap (Dr. Bronner's plain)
- White vinegar, diluted 1:10
- Microfiber cloths (lint-free)
- Soft natural-bristle brush
- 3% hydrogen peroxide (spot treatment only)
- Fine-grit sandpaper (220+) for stains
- Bleach or chlorine products
- Ammonia / glass cleaner (Windex)
- Pine-Sol, Lysol, or any scented cleaner
- Wood polish, varnish, or oil
- Essential oils directly on wood
- Paper towels (leave fibers)
- Steam cleaners or pressure washers
- Petroleum-based anything
"The wood inside an infrared sauna is intentionally unsealed. That's a feature, not an oversight — it lets the cabin breathe and lets you smell the cedar. But it also means whatever you put on the wood gets inside the wood. Then it bakes. Then you smell it, forever."
— Sauneer Editorial Team
Dealing With Stains: A Realistic Triage Guide
Not every stain is fixable. But most are, if you catch them within the first week.
Light surface marks (water rings, sweat halos)
Damp microfiber with warm water. Wipe in the direction of the wood grain. If a faint outline remains, follow with a 1:10 vinegar wipe and dry immediately. 9 times out of 10, this is enough.
Set-in dark spots (the dreaded sweat blotch)
Mix 3% hydrogen peroxide with warm water at 1:1. Apply with a cotton ball, let sit 60 seconds, blot dry. Repeat up to three times. Wait 24 hours before next sauna use.
Deep stains and burn marks
Fine-grit sandpaper (220 or higher). Sand only with the grain, in light passes. Vacuum the dust, wipe with a barely-damp cloth, let cure 24 hours. This is the nuclear option — use sparingly, because every sanding removes a hair of wood.
Watch: Removing Stubborn Stains the Right Way
The Monthly Audit (10 Minutes That Save Thousands)
Once a month, walk through this checklist with the cabin cool and the door open:
Electrical & Heaters
- Inspect heater faces for dust film — brush off if present
- Confirm all heaters glow uniformly on a 2-minute test run
- Check power cord and plug for any discoloration or warm spots
- Run a hand along every bench surface — feel for splinters or rough patches
- Look at corners and joints for any darkening or moisture pooling
- Check the floor under the duckboard for puddles or warping
- Tighten any visible screws on benches and backrests (heat cycles loosen them)
- Lubricate door hinges with a dry graphite stick — never oil
- Test the door seal: a slip of paper should pull out with light resistance
- Sniff. Honestly sniff. If anything smells "off," deep clean before next use
- Check that the vent (if equipped) is unobstructed
Seasonal Care: What Changes Through the Year
The Seven Habits That Separate 10-Year Saunas From 3-Year Disasters
- Always shower before — not just after. Lotion, sunscreen, and deodorant are wood killers.
- Sit on a towel. Every time. No exceptions. A $4 towel protects a $4,000 cabin.
- Never store anything inside the cabin between sessions. Magazines, robes, water bottles — all absorb humidity and re-release it later.
- Open the door immediately after every session. This single habit eliminates 90% of long-term odor issues.
- Never use the sauna with wet hair. Drips reach places towels don't.
- Replace floor mats annually. They're the cheapest insurance policy in the sauna world.
- Document any unusual smell, sound, or stain with a phone photo. Patterns matter — and your future self will thank you.
When to Call a Professional
Most maintenance is fully DIY. But three situations warrant expert eyes:
- A heater that glows unevenly, dims, or trips a breaker. Carbon panels are a fire risk when failing — don't troubleshoot electricals yourself.
- Wood that's softening, swelling, or showing black mold spots. This means moisture has gotten inside the wall, and the panel likely needs replacement.
- Any electrical smell during operation. Power off immediately, unplug, call the manufacturer. Do not run the cabin again until inspected.
The Bottom Line
An infrared sauna isn't a fixture. It's a wellness instrument — one that rewards the owner who treats it like a beloved cast-iron pan instead of a hot tub. Five minutes after every session. Fifteen minutes once a week. Ten minutes once a month. That's it. That's the whole contract.
Do this, and a decade from now you'll still be settling onto warm, honey-colored wood, breathing air that smells faintly of cedar and nothing else, watching the heaters glow at full output. Skip it, and you'll be shopping for a replacement before your warranty paperwork has yellowed.
Your sauna is asking for five minutes. Give it five minutes.
Key Takeaways
- Choosing the right how to clean an infrared sauna means matching capacity and output ports to your actual devices
- Always check actual watt-hours (Wh), not just watts — runtime depends on Wh, not peak output
- Also covers: infrared sauna maintenance
- Also covers: sauna wood care
- Also covers: cleaning sauna heaters
- Compare price-per-Wh across models to find the best value for your budget